Crochet Pattern: Sitting Baby Panda Amigurumi Free Pattern
CreativeNest Crochet Pattern
A sweet handmade crochet panda pattern, perfect for a cozy handmade project.
Why Make This?
Looking for a fun and rewarding crochet project?
This adorable design is a great way to turn a few simple materials into something special.
It's cute, customizable, handmade, and perfect for
gifts, nursery décor, seasonal decorations,
or simply adding a unique touch to your collection.
Plus, you can experiment with different colors and details
to make your own version truly one of a kind.
Watch the Tutorial
Follow the step-by-step video and bring your crochet panda to life.
Finished Size
Approximately 10 in (25 cm) tall seated,
7 in (18 cm) wide across the hips/arms,
6 in (15 cm) deep front to back.
All measurements approximate, based on worsted weight yarn and 4mm hook gauge.
Materials
Worsted weight yarn (Yarn weight 4) in:
Cream/Off-White (MC) – approx. 120g
Black (CC) – approx. 100g
Small amount of Tan/Beige for paw pad details
4.0mm (US G/6) crochet hook
12mm black safety eyes (2)
Polyester fiberfill stuffing
Black embroidery thread for nose and mouth
Tan/Beige embroidery thread for paw pad accents, optional
Yarn needle
Scissors
Stitch markers
Straight pins for assembly placement
Abbreviations
MR: Magic Ring
sc: single crochet
inc: increase (2 sc in same stitch)
dec: invisible decrease
sl st: slip stitch
ch: chain
BLO: back loops only
FO: fasten off
st(s): stitch(es)
rnd: round
Techniques
Magic RingUsed to start all round pieces for a tight, closed center.
Invisible DecreaseInsert hook into front loops of next two stitches, yarn over, pull through both, complete as normal sc. Produces smoother shaping than standard dec.
Working in Continuous RoundsNo joining or turning; use a stitch marker to track the round start.
Color ChangingSwitch colors on the last yarn-over of the final stitch before the change so the new color is ready for the next round.
Surface EmbroideryUsed for the nose, mouth, and claw details.
Sewing Pieces TogetherWhip stitch or mattress stitch with matching yarn and a yarn needle, using the long tails left on each piece.
A. Head (Cream)
Rnd 1: 6 sc in MR (6)
Rnd 2: 6 inc (12)
Rnd 3: (sc, inc) x 6 (18)
Rnd 4: (2 sc, inc) x 6 (24)
Rnd 5: (3 sc, inc) x 6 (30)
Rnd 6: (4 sc, inc) x 6 (36)
Rnd 7: (5 sc, inc) x 6 (42)
Rnd 8: (6 sc, inc) x 6 (48)
Rnd 9-16: 48 sc (48) — 8 rounds even, forms the rounded skull
Rnd 17: (6 sc, dec) x 6 (42)
Rnd 18: (5 sc, dec) x 6 (36)
Rnd 19: (4 sc, dec) x 6 (30)
Rnd 20: (3 sc, dec) x 6 (24) — insert safety eyes now
Rnd 21: (2 sc, dec) x 6 (18)
Rnd 22: (sc, dec) x 6 (12)
Rnd 23: 6 dec (6)
Head Shaping
Stuff firmly, shaping into a full round head. FO, leaving a long tail for sewing to body.
B. Eye Patches (Black) – Make 2
Rnd 1: 6 sc in MR (6)
Rnd 2: 6 inc (12)
Rnd 3: (sc, inc) x 6 (18)
Rnd 4: (2 sc, inc) x 6 (24)
FO, leaving a long tail for sewing flat as an appliqué (do not stuff).
C. Ears (Black) – Make 2
Rnd 1: 6 sc in MR (6)
Rnd 2: 6 inc (12)
Rnd 3: (sc, inc) x 6 (18)
Rnd 4-5: 18 sc (18)
FO, leaving a long tail. Flatten and sew as a half-circle onto the head, do not stuff.
D. Body (Cream, transitions to Black legs at base)
Rnd 1: 6 sc in MR (6)
Rnd 2: 6 inc (12)
Rnd 3: (sc, inc) x 6 (18)
Rnd 4: (2 sc, inc) x 6 (24)
Rnd 5: (3 sc, inc) x 6 (30)
Rnd 6: (4 sc, inc) x 6 (36)
Rnd 7: (5 sc, inc) x 6 (42)
Rnd 8-9: 42 sc (42)
Rnd 10: (5 sc, dec) x 6 (36)
Rnd 11-14: 36 sc (36) — begin stuffing lightly here
Rnd 15: (4 sc, dec) x 6 (30)
Rnd 16-18: 30 sc (30)
Rnd 19: (3 sc, dec) x 6 (24)
Rnd 20-21: 24 sc (24) — stuff firmly
FO, leaving a long tail for sewing to head. Body neck opening stays open for stuffing access before closing.
E. Arms (Black, cream paw pad) – Make 2
Rnd 1: 6 sc in MR (6)
Rnd 2: 6 inc (12)
Rnd 3: (sc, inc) x 6 (18)
Rnd 4-5: 18 sc (18)
Rnd 6: (sc, dec) x 6 (12)
Rnd 7-20: 12 sc (12) — long tapered arm tube for the extended reaching pose
FO, leaving a long tail for sewing to body.
Cream Paw Pad – Make 2
Rnd 1: 6 sc in MR (6)
Rnd 2: 6 inc (12)
Flatten slightly and sew to the underside of each arm tip. Embroider 3 small claw lines in black at the paw edge.
F. Legs / Feet (Black, cream paw pad) – Make 2
Rnd 1: 6 sc in MR (6)
Rnd 2: 6 inc (12)
Rnd 3: (sc, inc) x 6 (18)
Rnd 4: (2 sc, inc) x 6 (24)
Rnd 5-8: 24 sc (24) — this forms the flattened foot base
Rnd 9: (2 sc, dec) x 6 (18)
Rnd 10-15: 18 sc (18) — shorter leg column, since panda sits with legs tucked
FO, leaving a long tail for sewing to body.
Foot Paw Pad (Cream, make 2)
Rnd 1: 6 sc in MR (6)
Rnd 2: 6 inc (12)
Rnd 3: (sc, inc) x 6 (18)
FO, leaving a long tail. Sew flat to the sole of each foot, rounded end forward.
Color Changes
Head, body torso front, and muzzle: worked entirely in Cream.
Ears, eye patches, arms, and legs: worked entirely in Black; no mid-piece color changes needed since each is a solid-color component sewn on separately.
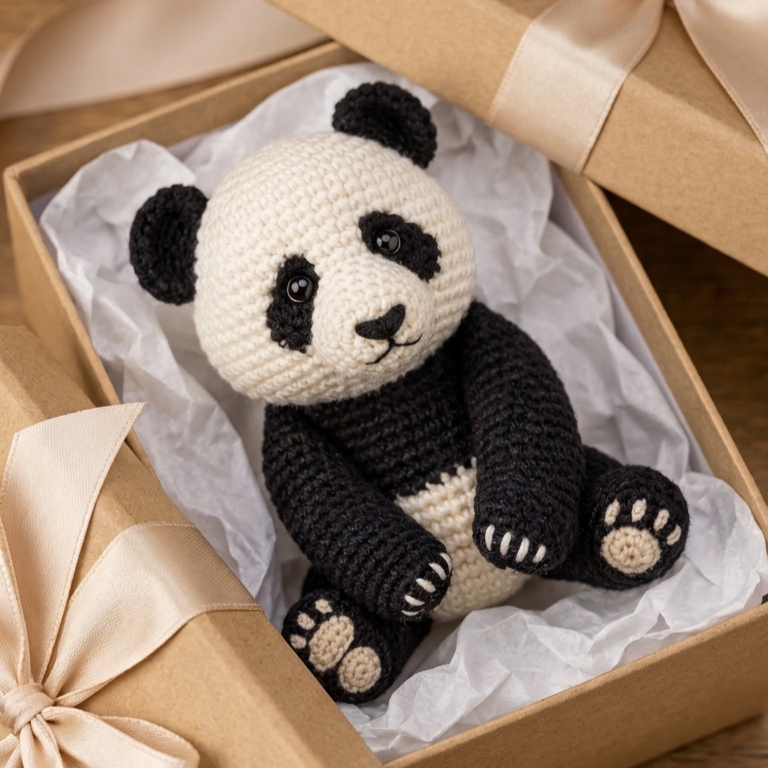
Body: Cream throughout; the black "shoulder/hip" coloring visible in the image is created by the black arms and legs overlapping the cream torso at assembly, not by color-changing within the body piece itself.
Facial Features and Small Details
Eye Patches: Sew the two black eye-patch appliques (Part B) onto the head centered around Rnds 17-20, angled slightly outward and downward like teardrop shapes, approximately 8-9 stitches apart at their inner edges.
Safety Eyes: Insert one 12mm black safety eye through the center of each eye patch and through the head fabric at Rnd 20, about 9-10 stitches apart. Secure washers firmly on the inside before continuing to stuff.
Nose: Embroider a rounded triangular nose in black embroidery thread centered on the muzzle at approximately Rnd 10-11 of the head (measuring from the neck opening), using satin stitch to build up a solid black triangle shape.
Mouth: Embroider a small centered vertical stitch below the nose, then two curved stitches branching down and outward to each side, forming a subtle "w" smile.
Claws: Using cream or black thread, add 3 short straight stitches on the front edge of each paw pad (arms and feet).
Stuffing
Head: Begin stuffing after Rnd 8, adding fiberfill in small amounts and pushing it toward the crown to keep the round shape smooth; continue stuffing firmly through Rnd 20 before inserting eyes, then finish stuffing to Rnd 22, keeping the fabric firm but not stretched.
Body: Stuff lightly starting at Rnd 11, increasing firmness by Rnd 15, and packing very firmly by Rnd 19 to create a solid seated base that can support the head's weight.
Arms and Legs: Stuff lightly and evenly along the tube, leaving the last 2-3 rounds near the opening unstuffed to make sewing to the body easier.
Shape each piece with your fingers while stuffing to keep curves smooth and avoid lumps; finish stuffing just before closing each piece with FO.
Assembly
Head to Body: Center the head opening over the neck of the body, matching the front of the face forward. Pin in place, then whip stitch around the opening using the long tail, tucking the seam under the chin slightly to angle the head forward and down, as in the reference pose.
Ears: Sew the ears to the top-back sides of the head, straddling Rnds 3-6 from the crown, spaced about 10-12 stitches apart, curving slightly forward.
Arms: Sew the arms to the upper sides of the body at Rnd 6-8 (just below the shoulder curve), angling them to cross and rest on the ground in front, mimicking a seated lean-forward pose.
Legs: Sew the legs to the lower sides/front of the body at Rnd 17-20, angled outward and slightly forward so the panda appears to be sitting with feet planted flat.
Weight distribution: Position the arms so their tips meet or cross near the center-front of the body for the "leaning forward" seated look shown in the reference.
Hide all yarn tails by weaving them through the stuffing and trimming close to the fabric.
Finishing
Weave in all remaining ends securely through several stitches before trimming.
Steam lightly or hand-shape each piece to smooth out any uneven stitches; do not use high heat on acrylic yarn.
Trim any stray fibers from the surface for a clean, tidy finish.
Double-check that safety eye washers and any sewn joints (arms, legs, head) are secure and won't loosen with handling.
Fluff the fiberfill through the fabric by gently pressing and reshaping the body and head for an even, rounded silhouette.
Watch the Crochet Tutorial
You're one step away from the tutorial. Continue below to access the video.
A quick verification step may appear before the tutorial becomes available.